
A quick look at the weather forecast confirms that I have not mistaken a rise in the UESW Index*, if as expected we do have a mini heat wave then it is time to brush off the barbecue and go get out the gas fired grill. Speed to your shed or garage and send the spiders spinning and check the charcoal. I get excited about barbecuing pretty much anything but today is all about the burger. The burger has become a much-maligned meal when it has the true potential for mouth-watering, meaty magnificence. Our supermarket freezers are stuffed with mechanically extracted, pulverised, ground and additive enhanced excuses and many of the massive chain restaurants serve products that are little better. If you intend to barbecue ( or grill if you must ) please, please, please have a go at making some yourself.
 At the heart of every burger is the meat to fat ratio, when selecting your cuts of meat to mince, you ideally want to achieve around 85% lean meat. The fat is very important to your finished burger, much of the flavour comes from the fat during cooking and is responsible for the correct mouthfeel of the finished product. The fat moistens the burger as it cooks but much of the fat will drain off onto your barbecue. If you cook too close to the coals this is when you get flaring as the fat ignites. Less than 15% fat and your burger will be dry, much more and your burger will shrink drastically during cooking. The finished burger will only be, a not unhealthy 5% fat so fear not if you are trying to diet, it is better for you than you think, positively rocking paleo speaking. You can ask your butcher for advice on which cuts to use but a fifty/ fifty split of ground chuck and ground sirloin will achieve outstanding results.
If you ask you butcher for advice he can help you with the next stage and mince your beef for you. You want to get a coarse grind. Too fine and the mixture is sloppy and the end result can be like rubber. You want to avoid working the meat as much as possible, your butcher will grind the beef in an industrial mincer which will process the beef quicker than a small handheld mincer. Many commercial burgers included numerous other ingredients but I like to keep it simple with just sea salt and plenty of freshly ground black pepper. If you do want to add other ingredients, an onion is just about acceptable, dice them very, very finely. Anything over the finest dice and the added ingredients will not cook and the minced beef will not hold together leaving you with burger pieces on the grill.
If your butcher prepares your mince for you, chill it for a couple of hours before you prepare the actual burgers. Keeping your seasoned burger mince cold by placing it in a bowl, in another bowl packed with ice, will result in a much better burger and help ensure a safe hygienic production. You could purchase a burger press if you are going to barbecue every weekend but it is just as easy to shape a medium sized handful into a ball then lightly pat it flat. Run some cold water over your hands to keep them cool before you shape your burgers and try to work them as gently and as little as possible. Over handling bruises the meat and will result in a tough, dry burger. Cover a tray with cling film and place the completed burgers onto the film. Cover with more cling film and store in the refrigerator until cooking time
Fire up your clean barbecu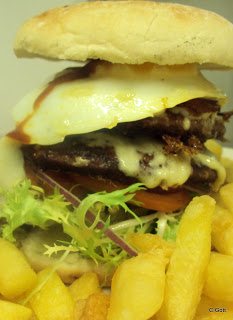 e and get the coals nice and hot so the grill heats up. Give the grill a good going over with a wire brush then very carefully give the bars a quick wipe of oil. The safest method is to sprinkle some vegetable oil on a thick fold of kitchen paper. Using barbecue tongues wipe the oiled paper over the grill to wipe off any remaining burnt fragments and charcoal dust. Once the barbecue is ready we can cook.
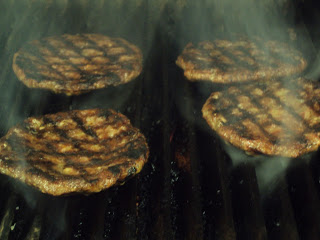
Brush the chilled burgers with a little olive oil to help prevent sticking and place on the grill. Quickly press down with your thumb in the centre of each burger to leave a slight indentation, as the meat cooks and the proteins contract and pull together this will stop the burger looking like a rugby ball, or for you Americans one shaped just like your footballs. Aim to leave around a third of your grill empty. You might think this is an underemployment of your glowing coals but if you do get flare ups you will have space to move your burgers and prevent them from burning. After three minutes give the burgers a ninety-degree turn ( that’s one quarter-turn ). If you think your burger is cooking too fast and it will burn just raise the grill one notch from the coals. Turning the burger will give the criss-cross appearance of char marks on your burger that will demonstrate your professional cooking skills. Do not be tempted to squash the burger with your spatula as this squeezes out the tasty melted fat leaving a dry burger.
After another two minutes, your burger is should be ready to flip, the edges will be browning and you might see pinkish pearls of moisture on the burger surface. As you develop your barbecue grilling skills you will learn the cooking times of different meats and cuts. You really only ever have to turn the burger over once let it cook for three more minutes and you can then check if it is ready. The cooking time is directly proportional to the thickness of your burger when it is ready any escaping juices will be clear and the internal temperature if you check it with a thermometer should be over 80C / 180F.
Place the cooked burgers on a warm plate, cover with foil and place to the side of the barbecue to keep warm and let them rest for a few minutes. Brush the cut sides of your burger rolls with a little melted butter and toast them over the coals. The rest is up to you, personally, I favour sliced pickles, crisp lettuce, and really ripe tomatoes and maybe a slice of Monterey Jack Cheese. Enjoy.
* Unexpected Early Short Wearing – the major exponent is my friend Steven but he is South African and cannot help it.