THE HUMBLE GRAPE – RESTAURANT REVIEW


London wine bars are two a penny but when you find one you like, just like a lucky penny, you’ll never let it go.

We were invited to try the Humble Grape’s latest opening at the lively Devonshire Square, pretty much opposite Liverpool Street station. Tucked away on Devonshire Row, The Humble Grape is extremely humble in size (see what we did there?) so we’d recommend booking your table in advance but this hideaway is certainly every wine lover’s dream.

Each wall is decorated with some of the finest bottles of wine you could imagine and, what’s more, they’re doing Retail Monday every (you guessed it) Monday. All the bottles can be purchased at their cheaper retail prices. All day long. The team advised us that it’s a hugely popular event and we’re not ashamed to say a Monday visit is already in the diary.

One of the things that surprised us most about this place was its incredible quality of food. Like the venue size, the menu is ‘humble’ but offers a fantastic selection of meats and side dishes, as well as a few mains to line your stomach if needed. The kitchen is tiny and fully visible from the seating area so at first, we were a little apprehensive about how the food would compare with the fantastic wine but we’re delighted to say that we were pleasantly surprised on a ridiculous scale.

The quality of the meats is second to none and the Iberica pork dish was mouth-wateringly tender and packed with flavour. It was topped with the most delicious slice of chorizo we might have even eaten and was accompanied by what we consider to be, quite possibly, the most deliciously crispy garlic potatoes.

Essentially, what we’re trying to say here is that we completely taken aback and fell in love with the food straight away. As a foodie, it was an incredible bonus and while the wine was extra tasty, it would be the food that pulls us back. Quality not quantity is clearly their motto.

We definitely do need to give a nod to the wine though but also the service. The waiting staff clearly knew their stuff and could of course partner every wine with every dish on the menu.

For us, the standout tipple was the Weingut Von Winning Sauvignon Blanc I, 2015, Pfalz, Germany and whilst the wine isn’t especially cheap per glass (roughly averaging at around £10) you definitely won’t be looking back towards your Blossom Hill after you’ve sipped this Sauvignon!

Finally, we’d be doing a disservice if we wrapped up this review without touching on the atmosphere. This bar is cosy, yet sophisticated but unlike some wine bars, doesn’t even have a whiff of pretentiousness. It’s clearly a place you can go to sit back, relax and enjoy some good food, good wine and the good company you’ll be taking along with you.

So, next time you fancy a genuinely great glass of wine or an incredibly tasty and reasonably priced dinner at a place that has a feel like your splashing out but no price tag to match, give The Humble Grape a try.

We were guests at The Humble Grape.

Book here: https://www.humblegrape.co.uk/wine-bar/liverpool-street/

CUBANA WATERLOO  – RESTAURANT REVIEW    

The amazing city of London, which we’re lucky enough to live in, is known for its celebration of cultures and Cubana celebrates culture like no other.

Just a stone’s throw from Waterloo station, Cubana is pretty tricky to miss when you pass it on the street due to its wall murals, brightly coloured outdoor seating area, authentic Cuban music blasting from its speakers and the traditional food stand out front (which you can purchase at insanely low prices). As soon as you head inside, you feel like you’ve been transported from London to Cuba, with Mother Mary statues and bold bright colours covering every single surface.

The highlight of Cubana, aside from its décor, has to be the food. Cubana does everything from main stand out dishes through to sharing tapas and individual bites and sweet, delectate desserts. You could definitely manage a few sides to go with your main and given the flavours are so good here, I’d definitely recommend it. The chorizo croquettes, lime covered chicken wings and yukka chips (a bizarre texture to grasp if you’re unfamiliar but incredibly tasty!) and the Pollo Criollo (free-range chicken, seared and casseroled in fresh orange, onions, garlic and sherry) was sweet and delicious. Definitely order yourself a side of their slaw too. It’s creamy, well-seasoned and goes with everything.

We ordered a few of our bits as starters and were getting a little nervous when we were waiting a while but it turns out everything was brought over as art of the main so definitely be really clear if you want your food staggered. In all honesty though, we really didn’t mind because it meant more of a feast to pick at!

The drinks menu is really reasonably priced and they do a two for one happy hour which even holds on a Saturday (quite difficult to find in the City!) which is from 4pm – 7pm and offers two for one on certain cocktail glasses and also jugs. A great bargain which we found drew the crowds in as soon as 4pm struck. If you fancy embracing the Cuban culture I’d recommend the strawberry and mango colada which genuinely just tastes like a smoothie (so drink responsibly!) but you also can’t go wrong with the jug of mojito to share. Absolutely packed with mint (and rum!) this is insanely refreshing and quite easily one of the best mojitos in town.

The venue is really open with high ceilings and is staggered across two floors which are split into three rooms. If you can, we suggest trying to get one of the podium tables. They’re both raised up and are really secluded so you have your own, sectioned off taste of Cubana (you’ll need to book these though because they only have two in the venue).

Don’t just consider Cabana as a daytime eatery though. We’re told the weekend evenings get LIVELY with live music and salsa dancers. Should you be heading down there soon, expect to see us back there!

You can book Cubana here: https://www.cubana.co.uk/

We were guests at Cubana restaurant and asked the owner to describe what’s good about the venue in his own words. He said: Cubana is London’s freshest, juiciest bar-restaurant, where you can enjoy authentic Cuban and Latin-American dishes, freshly-prepared with free-range produce, the very best Mojitos and fresh tropical cocktails and late night live Salsa – all at reasonable prices

London – The UK’s Brunch Capital


We’ve tried and tested our fair share of brunches in London and with new places popping up all the time, we wanted to throw down our forks (not literally, that’s not beneficial at all), and confidently confess to you what we consider to be the best brunches in town.


Dirty Bones (Bottomless option – yes)

‘Dirty’ being the perfect word. An American and darkened eatery, this place offers some of the tastiest breakfast grub around and there’s a bottomless brunch option so you can settle yourself in for the morning – win!

The cocktails are more adventurous than you ordinarily find yourself having on a typical bottomless brunch and include vodka and rum based options. The service can be a little slow to keep the drink topped up though so you have to keep an eagle eye on the waiting staff. If guzzling your way through the menu and making the most of each precious bubbly minute isn’t your primary objective though, this will be fine for you.

Food wise, we have two words for you: cheeseburger dumplings.

Good for you if: You want a low key, meaty brunch.

Book here: https://dirty-bones.com/


Beech Blanket Babylon (Bottomless option – no)

This place is always popping up as the ‘place to be’ on Instagram so we put it to the test. The décor is amazing. It’s lavish and luxurious but what more do you expect from Notting Hill! There’s no bottomless brunch on offer but the cocktails are brilliant value for the area at £10 a pop, so worth a visit.

Menu wise, their eggs benedict is a firm favourite – its béarnaise sauce is creamy, rich and has a kick. The house burger with caramelised onion, cheese and salad is really filling – juicy too!

Good for you if: Keeping up appearances is key. The clientele at Beech Blanket Babylon are predominantly Notting Hill locals so it’s less of a tourist attraction and instead will give you a taste of life ‘on the other side’.

Book here: http://www.beachblanket.co.uk


Hotbox (Bottomless option – yes)

Loud, busy and offering dishes that are deep with flavour. The waiting staff are as attentive as we imagine Prince Harry is to Meghan and your glass rarely gets empty. Exactly what we want from a bottomless brunch.

Located slap bang in the middle of Shoreditch, this former street art gallery (obviously) is rife with hipsters and has a real ‘up close and personal vibe’ as your’re seated along picnic style benches.  The food is all about the smokey meaty ‘cue, that’s what the cool kids say nowadays, and the meat is dry rubbed and cooked low and slow to create tender, succulent cuts that melt in the mouth.

Good for you if: You’re a sociable meat-lover wanting a good booze up.

Book here: http://hotboxlondon.co.uk/


Bunga Bunga (Bottomless option – yes)

‘Bigger, better and brunch-ier’ as they so eloquently put it, this is definitely the place to go if you want to show your friends a proper party. There’s live entertainment in the form of its Bunga Matinee show and you will feel like you’re enjoying your Saturday night out, no matter what the time is.

The menu is of course Italian and while the pizzas are authentic and tasty, you won’t be choosing this place if you’re just seeking out good grub.

The Bunga Bunga party brunch is definitely something every Londoner should experience but you might only do it the once as it comes with a hefty price tag and cancellation fee.

Good for you if: You’re looking for a PROPER party

Book here: https://battersea.bungabunga-london.com


Mac ‘n’ Wild (Bottomless option – yes)

Self-described as serving London with some of the best Scottish produce, this place is serious with its flavours. Haggis pops, veni-moo burgers and venison Scotch eggs are forces to be reckoned with and what we love about this place is the variety in its bottomless brunch cocktails.

The atmosphere is relaxed and the staff are always on hand to top up your glass. It’s very unlikely you’ll even reach the bottom of it!

Enjoy unlimited brunch cocktails for just £21 per person

Book here: www.macandwild.com

And our curveball…. PAUL (Bottomless option – yes)

So this is one we’ve thrown in if you find yourself sleeping through a bottomless brunch (we’ve all been there). PAUL, the decedent, Parisian patisserie is now offering a bottomless afternoon tea. Two hours of bubbly joy on Saturdays and Sundays. The afternoon tea includes lightly toasted sandwiches, a buttery brioche with whipped cream and jam and a host of sweets.

Definitely more civilised than your average brunch – one to enjoy with family, perhaps?

Bottomless afternoon tea is served Monday to Friday 2.30pm – 5.30pm at Tower 42 and weekends only in Covent Garden at the same time

Book here: www.paul-uk.com

The Grid: An Immersive Black Mirror/Dystopia Inspired Escape Experience

Image:  Courtesy of brand

The Grid is an immersive, multi-room alcoholic escape experience where patrons get to go undercover an Artificial Intelligence firm in an attempt to learn and defeat the “system”

The tech-driven escape experience challenges guests to puzzles across a series of rooms, with the bar as a backdrop.

Participants are invited to join The Grid, a secret society of individuals working to safeguard humanity’s future against machines.

On the day of the experience, they arrive undercover at the AI corp’s (neosight.org) HQ, where they must move between different rooms, interacting with the Artificial Intelligence and Neosight specialist technology as they try to stop the corp from crunching human data for the “greater good”. The 1.5 hour experience is full of surprises, bespoke tech and futurists tonics (sci-fi cocktails).

“I believe the future of hospitality is all about having fun. Fun now lies in experiences and not only food and drink. This is our first multi-room experience and I am very excited for it,” said Sebastian Lyall, Founder of Lollipop, the immersive experience group behind The Grid.

Lollipop is an immersive lifestyle group known for its experiential creations both here and abroad, including ABQ (abqlondon.com), The Bletchley (thebletchley.co.uk) and The Bunyadi (thebunyadi.com). The mission of the group is to design experiences that cater to the more demanding consumer of today. The group has also recently launched a drink at home wine experience, Vinny (wearevinny.com)

The Grid is set to open its door to public in July/Aug. The waiting list is now open and reservations will be released on a first come first served basis.

Tickets will be priced between £30-£40 per head for a 1h 30m experience and 2 cocktails.

Website: thegrid.london (use code 456712)

Simnel Cake Recipe

Makes: 1 x 20 cm round cake

Equipment: 20 cm round, deep, loose-bottom cake tin

This Simnel cake goes down a treat in the lead up to Easter. Apart from upgrading many of the ingredients for better health, our twist is the addition of goji berries and a few of our favourite spices. The use of dried berries and fruits adds chew and important fibre. Don’t put too much on your plate – this is a rich one!

175 g unsalted butter

175 g coconut sugar

3 eggs

175 g spelt flour

175 g sultanas

90 g dried cranberries

30 g dried goji berries

zest of 1 lemon, grated

2 tsp baking powder

1 tsp mixed spice

½ tsp ground turmeric

½ tsp ground ginger

½ tsp ground cinnamon

½ tsp freshly ground black pepper

pinch of salt

To Decorate

Raw marzipan (see below)

Honey or melted butter, for brushing

Edible flowers, such as nasturtiums and

violets, to decorate

1 Preheat the oven to 170°C/fan 150°C/

Gas mark 3–4 and line a 20 cm round, deep,

loose-bottom cake tin with baking parchment.

2 Put all the ingredients into a large bowl.

With an electric whisk, beat them together

until well combined.

3 Pour the mixture into the prepared tin and

smooth the top. Bake for 1V–2 hours until

a skewer inserted into the middle comes

out clean.

4 Leave the cake to cool in the tin for 10 minutes

and then turn out onto a cooling rack.

5 Once it’s cool, use the cake tin as a template

to cut out a round disc of raw marzipan.

6 Brush a little melted butter or honey over

the top of the cake and lay the marzipan

disc on top.

7 Use the remaining marzipan to make

11 equal-size balls to decorate the top of

the cake. You can use honey to stick these

on as well.

8 Top the cake with edible flowers such

as nasturtiums and violets.

raw marzipan

Raw Marzipan

GF, DF, V

Our raw marzipan is quick and easy to make, with the maple syrup helping to keep the delicious almond flavour. If you particularly like your marzipan, and I really do, you can also add a few drops of almond extract.

340 g ground almonds

3–4 tbsp maple syrup

1 tsp vanilla extract

2–3 drops of almond extract (optional)

1 Mix all the ingredients together to form

a dough. Wrap in greaseproof paper and chill

until ready to use.

2 Roll out the dough between two sheets of

baking parchment to 2–3 mm. You don’t want

to use flour to stop it sticking to the surface,

and the paper will also make it easier to

pick up.

Modern Baker: A New Way To Bake by Melissa Sharp with Lindsay Stark (Ebury Press, RRP £26). Photography by Laura Edwards. Available from amazon.co.uk 

Multiseed Sourdough Recipe

Makes 1 loaf

Equipment round proving basket

DF, V+

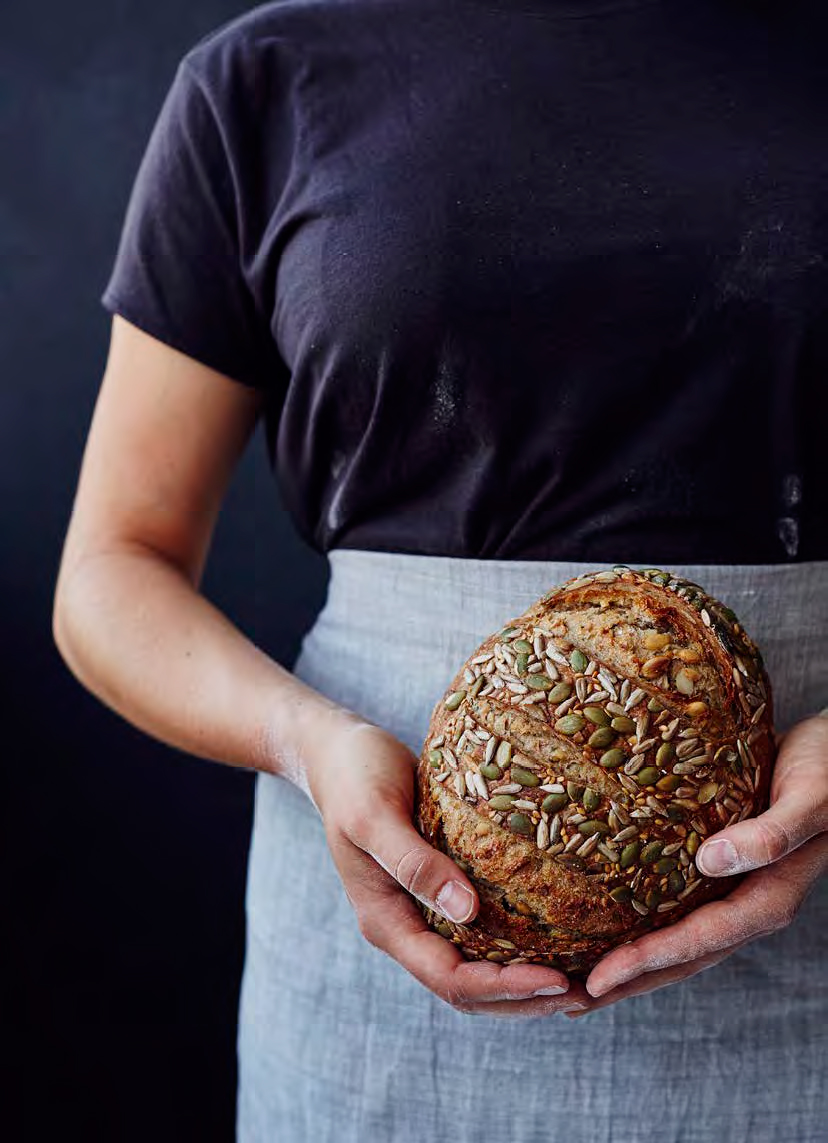
This is the most popular loaf at the bakery. It has a devoted following among regular customers – one family buys ten at a time for their freezer! – and the most frequent first loaf for new customers. It’s also popular with the restaurants we sell through. It is earthy and honest with primal qualities, no doubt the second leavened bread made by man. Under any analysis, made with well sourced ingredients this loaf is as healthy as it gets, with the seeds providing a protein

hit as well as extra fibre and layers of extra flavours. Yet despite all this goodness and history, it’s still an everyday loaf that every member of your family will enjoy. We make this in both a tin and a round shape. These instructions are for the round loaf, but you can use any of the alternative shaping instructions from other recipes.

Day 1

50g strong white flour

50g water, at hand warm temp (32–37°C)

Active wheat starter (see below)

Mix the flour and water with the whole

quantity of the starter and leave loosely

covered at room temperature overnight.

35g sunflower seeds

35g pumpkin seeds

35g golden flaxseeds

15g sesame seeds

335g water

Soak the seeds in the water and leave at room

temperature overnight.

Nutrition Note:

We soak the seeds for a couple of reasons. The first is to do with the bread-making process. If you don’t soak the seeds they will absorb water from the dough, resulting in a drier dough and a heavier texture in the bread. So soaking the seeds guarantees a much more consistent loaf. The other benefit is that you activate them, which makes them release additional nutrients so that they are easier for your body to absorb.

Day 2

100g recipe starter made on Day 1

Water and seed mix from Day 1 (above)

335g strong white flour

40g rye flour

8g salt

Extra seeds for topping

1 In a large bowl combine the recipe starter with

the water and seeds and mix gently.

2 In another bowl combine the two flours and

the salt.

3 Add the flour mix to the first bowl and mix

using one hand until a dough forms. This takes

only a couple of minutes. It’s a good idea to

use only one hand, leaving the other one clean

for using utensils, etc. Use a plastic dough

scraper around the bowl to make sure all the

flour is mixed in. Cover the bowl with a shower

cap or damp tea towel and leave it to rest

at room temperature.

4 After 5–10 minutes, give the dough a fold in

the bowl. Use slightly wet hands to prevent

the dough sticking to them. Pull a section

of the dough out to the side and fold it into

the middle of the ball. Repeat this going

around the ball of dough until you get back

to the beginning (four or five folds). Use the

scraper to turn the dough upside down, cover

the bowl and leave for another 5–10 minutes.

Repeat this three times. After the final fold,

cover the bowl again and leave to rest for

1 hour at room temperature.

5 Turn the dough out of the bowl onto a lightly

floured surface. Stretch out one side of the

dough and fold it into the middle. Repeat

this with each of the four ‘sides’ of the dough.

Put the dough back in the bowl upside

down and leave to rest for another hour

at room temperature.

6 Shaping a round loaf: Once the dough

has rested, turn it out onto a lightly floured

surface. Stretch one side of the dough out

and fold it into the middle. Repeat this all

around the outside of the dough until you

get back to your starting point. Flip it so the

seam side is facing down. Use your left hand

to hold the dough in place and use your right

hand to rotate the dough, tucking it under

and tightening it as you go around (if you are

left-handed you might want to use your right

hand to stabilise and your left hand to rotate).

The idea here is to increase the strength of

the dough without tearing it. The final surface

of the dough should be taut to the touch.

7 Put the remaining seeds in a bowl. Brush the

top of the dough with water and dunk it in the

seeds so that they are evenly spread over the

top. Place the dough so that the seam is facing

up and the seeds face down in a round proving

basket. There is no need to flour the basket

as the layer of seeds will prevent the dough

from sticking.

8 In the bakery at this point we put the dough in

our cool retarder cabinet for it to prove slowly

overnight. This helps it to develop more flavour

and become even healthier as it ‘pre-digests’

more of the gluten and ferments even more

probiotic qualities. Your version of our retarder

is your fridge – and you can leave the proving

basket in it overnight, covered with the tea

towel or shower cap. Take it out as you are

heating the oven. It’s fine for it to go in cold.

However, if you would prefer to speed things

up a little, at this stage you can simply leave

the dough in a warm place (ideally 24°C) until

it has more or less doubled in size. This should

take 2–4 hours. To test when the dough has

proved enough, press your finger about 2–3 cm

into it, then remove. If the dough pushes back

out slowly it is ready. If it springs back quickly

it is under proved; if it doesn’t spring back at

all, it is over proved. There isn’t much you can

do about that. The bread will be edible, but

more liable to collapse.

9 Preheat the oven to 250°C/fan 240°C/

Gas mark 10 or the highest temperature on

your oven. Place a roasting dish in the bottom

of the oven to heat up. Fill a cup with water

and place to one side ready to use. Also put

a flat baking tray in the oven to heat up.

10 When the oven is up to temperature, take the

hot baking tray out, lightly dust it with flour

and then turn the dough from the proving

basket out onto the tray. Slash the dough with

a sharp knife. Make sure that when you slash

you use one quick, smooth action, do not saw

at the dough. This will give you a much cleaner

line. In the bakery we use a single diagonal

slash down the loaf, but there are endless

variations you could use – be creative, define

your own distinctive pattern.

11 Place the baking tray in the oven and pour

the glass of water into the preheated roasting

dish at the bottom of the oven. The moisture

from this makes the dough lighter, helps

to set the crust and gives it a lovely sheen.

12 Turn the temperature down to 240°C/

fan 220°C/Gas mark 9 and bake for

approximately 30 minutes. To check if the

bread is baked through, tap the bottom –

it should sound hollow.

13 Leave the bread to cool for at least an hour

before eating. If you eat it when it’s still hot,

it will not have settled and so will be more

difficult to digest.

Making Your Sourdough Starter

A sourdough starter is how we cultivate wild yeast in a form that can be used for baking and has been done for thousands of years. The easiest way to make one is simply to combine flour and warm water and let the mixture sit for several days. In theory, you will only need to do this once in your life and it is unique to you.

The start is the magic, the genius, at the heart of everything we do and everything in this book. It’s an ancient technology, discovered by accident and passed from generation to generation. It forms the basis of transformation foods with unbelievable powers of preservations and flavour.

A lot of people are intimidated by the idea of making and keeping a starter, but it really doesn’t need to be daunting and is in fact something a child could do, getting a starter going takes 2 minutes a day, over 5 days. It’s really not that much effort at all. If you use it on a regular basis, maintaining it just becomes part of your bread and baking routine, and if you do not use it as regularly, or you’re going on holiday and are worried about leaving it for a while, don’t be. It can cope!

Keep your starter in the fridge unless you are using it every day. Bring it out to top it up, then return it when you have finished using it in your recipes. It will be fine there even for a few months without being used. It may separate in the meantime, but don’t panic, just mix it back together. To get it going again you want to really overwhelm it with food. So throw half of it away and add 100g flour and 100g warm water. Leave it overnight at room temperature and the next day it should be active again, i.e. bubbling away. It really is that straightforward.

At this stage you could use it, but we would actually recommend throwing half of it away again and topping it up with however much you need for your recipe. We find that by taking that one extra day with a rejuvenated starter you get a much more active starter, resulting in a better flavour and rise in your bread.

A sourdough start is also known as a ‘levain’, and sometimes a ‘mother’ (because it keeps producing babies).

In the bakery, we have three bread starters: wheat, rye and brown rice for gluten-free baking. For our basic sourdough, we use the wheat starter. This has an almost cheesy smell to it and a slightly more mellow flavour than the rye starter.

Wheat Starter

Equipment A container with a lid or a clean jam jar

Day 1

  • 1 tsp strong white flour
  • 1 tsp water, at hand warm temp (32-37oc)

Mix together the flour and the water in a container with a lid. We recommend mixing with your hands rather than a spoon. As disgusting as it might sound, we all have naturally occurring yeasts on our hands, so this can give your starter a real boost.

Leave the mixture overnight at room temperature. Cover it with the lid but do not make it airtight. A screw-top jar with the lid partly done up is perfect. You want the yeasts in the air to get in, but you also want to stop the mixture drying out.

Day 2

  • Wheat starter made on Day 1
  • 1 tsp strong white flour
  • 1 tsp water, at hand warm temp (32-37oc)

Throw away half of the mixture from Day 1. This is because you want to almost overwhelm the bacteria/yeast in the starter with food, by adding more flour than the weight of the original mixture. You could do this by adding more flour and warm water and not throwing any away, but you would very quickly end up with an excessively large amount of starter.

Stir the flour and water into the remaining mix and leave again at room temperature overnight.

Days 3 and 4

Repeat Day 2

Day 5

By now you should notice your starter has bubbles in it. This means it is ready! Don’t worry if it smells acidic or cheesy, this is completely normal and each starter will create its ow unique fragrance. Now you have your own living, bubbling jar of healthy microbes that you’ll be using for years to come.

How to use your starter in baking

Now you have your active starter you’re ready to start sourdough baking. The first thing to remember is that to make sourdough recipes you will need to build up your active starter (using all of it) the day before your bake. How to do this is detailed in each recipe under the heading on Day 1.

Having built your starter up, you will need to use most of it for the recipe (in the recipe we refer to it as the Recipe starter). What you don’t use, you retain as your ongoing active starter for your next recipe – you don’t want to have start from scratch each time! This all sounds more confusing that it really is.

Trouble-shooting

If the starter isn’t obviously bubbling, keep repeating Day 2 until it starts to. Quite a few factors can affect how long it takes a starter to activate, temperature being one of the main ones. If you begin your starter in cold conditions it may take longer to get going. Also, the general environment can have an impact. In the bakery, as we are making bread every day, there is so much yeast in the atmosphere that we find starters can take just a few days to get going, whereas if a kitchen is more sterile, it’s likely to take much longer.


Modern Baker: A New Way To Bake by Melissa Sharp with Lindsay Stark (Ebury Press, RRP £26). Photography by Laura Edwards. Available from amazon.co.uk


Celebrate Valentine’s Day with Viña Real Wines.

The look of love is in the air and we think Valentines is the perfect reason to wind down with a delicious dinner paired with a superb wine. Whether you’re sharing the day with a loved one, celebrating Galantines or just spending the evening enjoying your own company, Viña Real wine will not disappoint. Now we must admit, we were sent this wonderful package of wine weeks ago but with dry January in full tow we didn’t want to leave out any folk so here’s why Viña Real should be your top choice this week.

The award winning Spanish wine brand CVNE have continued to supply us with a wide range of quality Rioja wines since 1879. With age only comes wisdom and the winery, which is split into four, include Viña Real. The wines we tried were Viña Real Crianza and the Viña Real Barrel Fermented White but the brand also stock four other wines including a Rosado and a Gran Reserva.

First up the Viña Real Crianza, this is a charming red with a flavour of deep dark berries. This is a spicy red perfect for the Winter months and great for sipping with roasted meats. This wine is very easy to drink and can be found in Gordon’s Wine bar in London for £28 per bottle buy you can get this for a fraction of the price from a good wine retailer. This bottle certainly delivers much more than it’s modest price tag. Great value and great all rounder we think this would suit even the most discerning palette.

If it’s a quality white you’re after than the Viña Real Barrel Fermented white comes highly recommended. This wine is made up of 100% Viura or Macabeo grape which has become increasingly popular and is usually used to make up Cava wines. The barrel fermentation means that the wine is fermented in smaller oak barrels as opposed to large stainless steel and helps to highlight the texture which is creamy and light and helps preserve the fruit aromas, in this case gooseberry and honeysuckle. Again a moreish and fantastic value wine with an average price of £10.95

To find out more about CVNE and Viña Real wines visit www.cvne.com

Melissa’s Life-Changing Carrot and Olive Oil Cake

Makes 1 x 23cm round cake

Equipment 23cm round, deep, loose-bottom cake tin

Sorry for the melodramatic title of this cake but to be honest it was life-changing for me, so please just go with it. It’s the complex play of the spices that really brings this cake to life. Cloves, cardamom and cinnamon combine to heighten the flavours and aromas to an almost intoxicating level. With 500g of grated carrot in this cake there’s no getting away from its presence, though it’s surprising how the cake doesn’t really taste of it. Its purpose is to bind in the flour – in this case spelt, that is higher in protein and fibre than wheat. The fruity olive oil unifies all the other flavours. This recipe is so forgiving. Even overcooked, it’s still moist and delicious!

215 ml extra virgin olive oil

250g coconut sugar

4 eggs, beaten

250g spelt flour

2 tsp bicarbonate of soda

2 tsp baking powder

2 tsp ground cinnamon

1 tsp ground cloves

1 tsp ground cardamom

1 tsp salt

125g pecans, coarsely chopped

500g carrots, grated

Vanilla cashew nut icing or Maple cream

cheese icing (see below)

Roughly chopped walnuts, for topping

1 Preheat the oven to 190°C/fan 170°C/

Gas mark 5 and line a 23cm round, deep loose bottom

cake tin with baking parchment.

2 In a bowl mix together the olive oil, sugar and

eggs until well combined.

3 In a second bowl combine the flour and the

other dry ingredients and make a well in

the centre. Add the egg and oil mixture and

stir thoroughly until it is all blended. Finally,

add the pecans and carrots and mix again.

4 Pour the mixture into the cake tin and bake

for about 1 hour 20 minutes, until a skewer

inserted into the middle comes out clean.

5 Allow the cake to cool in the tin for

10–15 minutes, then turn it out onto a cooling

rack. Once it’s completely cool, top it with

either Vanilla cashew nut icing or Maple

cream cheese icing.

Nutrition Note:

The olive oil is rich in monounsaturated fats that are better for your heart than the saturated fats in butter.

Vanilla Cashew Nut Icing

Equipment High speed blender

GF, DF, V+

We have to get really creative when it comes to ‘icing’ our cakes as we don’t use icing sugar. This recipe is one of our go-to icing recipes, it’s really easy to make and absolutely delicious. The basic recipe is for a vanilla icing, but it can easily be adapted to different flavours – we particularly like to add matcha for a vibrant green colour!

150g unsalted cashew nuts, soaked for

At least 4 hours but preferably overnight

300g full-fat coconut milk

2 tbsp lemon juice

75g maple syrup

1 tsp vanilla extract

100g coconut oil, melted

Drain and rinse the soaked cashew nuts.

Put them in a blender with all the other

ingredients and blend until completely smooth

and creamy. Pour into a container and chill in

the fridge until firm. We usually leave the icing

in the fridge overnight, but around 4 hours

should do the trick.

Maple Cream Cheese Icing

GF

This is our take on classic cream cheese icing. It’s a lot less sweet and totally delicious.

2 tbsp maple syrup

225g organic full-fat cream cheese,

straight from the fridge

2 tbsp coconut oil, melted

1 Stir the maple syrup into the chilled cream

cheese until completely combined.

2 Add the melted coconut oil and mix very

quickly to prevent lumps from forming.

Modern Baker: A New Way To Bake by Melissa Sharp with Lindsay Stark (Ebury Press, RRP £26). Photography by Laura Edwards.