Is there any other seasonal vegetable that attracts your attention, and then tickles taste buds like fresh, tender asparagus spears? We are slap bang, right in the middle of the all too short, English asparagus season* and now is the time to sing the praises of this versatile vegetable. Char-grilled over the dying embers of a barbecue, baked wrapped in Parma ham or dipped in a luxurious duck egg, I simply cannot get enough of the stuff. Asparagus is grown and eaten pretty much worldwide, and because of the year long availability of imports it is no longer the quite the once sought out delicacy it was in English and European kitchens. But I am not talking about the bunches of stuff in your supermarket from Peru or South Africa, I mean the fresh, fine stems available for a limited time, if your are lucky enough from your garden or if not from your neighborhood Farmers Market or local Green Grocers.
*The English asparagus season traditionally begins on 23 April and ends on Midsummer Day.
Asparagus has been prized since Greek and Roman times as a culinary delight, for considered medicinal properties and was even used as a offering to their deities. Asparagus has also been considered to be an aphrodisiac , the sixteenth century erotic writer Shayk al Nefzawi, claimed a daily dish of asparagus, first boiled, then fried in fat with egg yolks and condiments, has ‘great erotic effects.’ I cannot go so far as to confirm his claims but asparagus is packed full of vitamins and minerals, is low in calories and sodium and is an excellent source of dietary fiber.
Before the recipe I better answer a couple of frequently asked questions. First is white asparagus different to green? The asparagus eaten in continental Europe is almost exclusively white, and you can see it regularly in jars on the shelves of good delicatessens. The lack of colour comes from obscuring the growing asparagus tips from day light by piling earth around the shoots. This ‘blanching’ of the stems as they grow results in white or ivory asparagus which is considered to be both less bitter and more tender than green asparagus. The stems however tend to be thicker and need peeling before cooking.
The second question is a little more delicate, does Asparagus make our urine smell funny? The problem is that not everyone can smell if in fact, if this is true. Some of the great minds of the past wrote about the subject, the American polymath ,Benjamin Franklin, in a letter to the Royal Academy of Brussels commented,”A few Stems of Asparagus eaten, shall give our Urine a disagreeable Odour…” Asparagus contains a protein that does alter the smell but it was not until 2010 that was it discovered that only about 22 per cent of the population have the necessary genes required to appreciate the result.
Storing, Preparing and Cooking
If you are not able to harvest your own asparagus bed and drop straight into a pan of boiling water, then when you buy your bunch and bring it home simply wrap in damp kitchen paper, put in a paper bag and place in the salad drawer of the fridge. You can also store it in a glass or jug of cold water in the fridge.
New season asparagus spears only require you to cut off the bottom centimeter and then a good wash under the cold tap to remove any grit. For larger older asparagus, which will have more pronounced flavour, grip the spear in both hands and bend until it snaps. Keep the top for eating and freeze the thicker woody end for making soup. If the end of the spear still feels a little tough, you can shave away the skin using a vegetable peeler.
Traditionally asparagus is boiled or steamed, for about three to five minutes, depending on thickness, until the stems are just drooping, but not totally soft and floppy. You then dip in hot melted butter or Hollandaise sauce. Alternatively the spears can be brushed with good quality olive oil, sprinkled with sea salt, then roasted or grilled, then served with freshly grated black pepper, a squeeze of fresh lemon juice and a few Parmesan shavings.
When you have collected a good quantity of frozen woody stems you can defrost and then simmer in a nice home made chicken stock with a couple of large, peeled potatoes. Blitz in a food processor then pass through a sieve. This will remove any stringy pieces but can be a little time intensive. You can finish this soup with a squeeze of fresh lemon juice, a little double cream or crème fraiche, a good amount of seasoning and garnish with a few fresh asparagus spears.
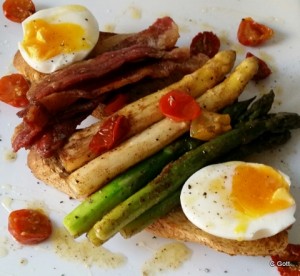
Toasted Sour dough, Bacon, Eggs and Asparagus
This is a delicious late Sunday breakfast or midweek lunch and the great thing is you can prepare most of it in advance, and there really is no recipe just some guidelines on times and quantities. A good supermarket or farmers market should provide all of the viands, don’t skimp one the quality of the bacon good, thick, fatty slices are best. I have included a ‘glug’ of olive oil, the amount is not particularly important, more than a drizzle less than a pour. I regularly use a glug at cooking demonstrations and everyone seems happier with that, than with metric or imperial amounts.
A generous slice of Sour dough bread per per person
One free range egg per person
Approximately four slices of streaky bacon per person
Six to eight asparagus spears per person
A handful of cherry tomatoes per person
Two cloves of garlic, peeled and thinly sliced
A couple of good glugs of quality olive oil
A generous sprig of fresh thyme
½ teaspoon caster sugar
Sea salt and freshly ground black pepper
Preparation
Halve the cherry tomatoes and place in a baking tray. Sprinkle with the sugar and very generously season. Spread over the garlic and thyme and drizzle with some of the oil. Place in a very low oven, Gas Mark 1 / 140 C / 275 F ( you can make these when you are preparing meringues if you are that organised), and leave for three to four hours. The resulting tomatoes should semi-dried intensifying and enriching the flavours and sweetness. You can keep the tomatoes in the remaining olive oil, in a sealed plastic container, in your refrigerator for up to a week and use on salads, in pasta dishes and sauces.
Bring a pan of water to the boil and add room temperature eggs, this stops the eggs from cracking and blowing in the pan. Boil for five minutes then refresh by plunging immediately in plenty of ice cold water to stop the cooking process. Peel the eggs carefully.
To Serve
Line a baking tray with foil to catch any drips and top with a baking rack. Lay out the bacon and place under a moderately hot grill to cook and crisp, turning occasionally. Wash the asparagus carefully and trim any thicker stems. Once the bacon is cooked remove from the grill and keep warm. Start to toast the bread. Heat a second pan of water and add a quarter teaspoon of salt. Poach the asparagus for three minutes the add the eggs and simmer for a further to minutes. Assemble the dish by buttering the toast and placing on the bacon and asparagus. Dress the asparagus with a little olive oil and a sprinkle of salt and pepper. Carefully halve the eggs and place on the plates with a few tomatoes and there we have it. Enjoy.