To celebrate their 10th Anniversary, our favourite online one-stop gift shop are treating us to a very exciting new venture. They are set to take over Spitalfields Market and transform it into a live and interactive shopping experience. Join them for Partner Workshops, demonstrations and food tastings and of course shop, shop, shop ’til you drop some of the UK’s best small creative businesses.
Not only will you be able to meet the people behind some of your favourite products, many of them will be looking for volunteers to make this an all encompassing, interactive experience. We’re sure our highlights will definitely include;
Naked Marshmallow; where the team behind Naked Marshmallow will be giving you the chance to toast your own marshmallows.
and…
Nia Tudor; talented illustrator Nia will be on hand to create some lucky visitors there very own personalised portraits.
As well as a host of other exciting things they have planned, it’s set to be well worth a visit.
Hole in your welly? No problem. Busted iPhone cable? No problem. Broken zip? Seriously, we could go on and on. Introducing… Sugru, The World’s first mouldable glue that turns into rubber. Now it may be hard to imagine getting excited about glue but Sugru is seriously life-changing stuff. Think Gaffa tape on acid or the love child of Superglu and Blu Tack and the cherry on top is that it comes in an assortment of colours so you can use it to get crafty as well as to fix things.
Born out of a humble idea, inventor genius Jane ni Dulchaointigh had in 2003 whilst studying for her MA, Sugru was merely a vice to make small enhancements in the kitchen such as plugging the sink or making a knife handle more comfortable. Almost twelve years later after much editing, enhancing and a little bit of trial and error along the way, Sugru had achieved world domination. The prototype was made simply out of Silicone Caulk and Wood, Jane realised it was useful and with most genius ideas, they will never leave you until everyone knows about it and Jane knew a good thing when she saw it. After sharing her creativity with the world, the fantastic Sugru is now ready and available for all of us to enjoy.
Sugru is available online @ sugru.com, B&Q, Homebase, Blacks and Robert Dyas. There are 3 kits to choose from including handy ideas to make home enhancements and 10 different colours available.
For Ideas on how to use your Sugru check out this handy video;
So check out Sugru for handy tips and genius ideas and get 10% off your first order!
Valentine’s Day is almost upon us; the time where it’s customary to celebrate the love of our lives in ways that truly matter. If there was ever something invented to capture a woman’s heart, then its jewellery and its things that sparkle. In the 21st Century, flowers and chocolate can only ever be the ‘bubble wrap’ to something with bigger, deeper meaning. For the 21st Century woman size doesn’t necessarily matter but quality does. Some of the sharp readers amongst you may have seen the title and thought the spelling of King was some kind of typo, but it is in fact the name of a new and upcoming artist K.ing with her latest jewellery Collection “Diamond K.ing”. A brand with an outspoken mandate in that it promises to treat each and every wearer as a Queen.
Model: Frances Lane Jewellery: K.ing Photography: Active 8 Images
Diamond K.ing is the gemstone of Inga Klabyte, who chose to employ everything that life threw at her to polish and reveal her inner diamond. Now under the artistic name of K.ing she makes a living by helping others to do the same. I find it astonishing to think that out of all the different types of companies one could create, the one she chose was jewellery making. However upon meeting her it is easy to see why; just like a diamond, the brand K.ing embodies and accentuates all her key strengths. For example, the number of hours that Inga puts into each design, the immaculate attention to detail which goes into each and every piece and the importance that she places on having each piece unique to the wearer.
The value of not taking things for granted is reflected in the “Diamond K.ing” logo. What appears to be a playing card of the ‘King of Diamonds’. Possession of this card can mean the difference between winning and losing and is essential in a hand of ‘Royal Flush’. In the same way K.ing jewellery is designed to be truly exclusive to the wearer and that absolute possession of the wearer is essential.
Model: Meriely Araujo Jewellery: K.ing Photography: Active 8 Images
I find myself pondering on why since time began jewellery has held such an elevated position with the sole purpose of making someone feel special. Why, Inga sparkles even talking about it, she truly believes that every woman is a Queen of someone’s heart and should be treated as such. Listening to her I find myself drawn off into a different world that as a man I had never truly appreciated: “Jewellery is the Queen of every woman’s wardrobe, it’s the jewel of Queen’s crown. There is no Queen with no jewels, simple as that. The truth is women love a good fairy tale crowned with dream come true relationships promising a sparkling future. If you manage to wake up the Sleeping Beauty inside her, you are and will always be her Prince Charming. So is she “Her Grace of Lace” like Queen Victoria or irresistible Scheherazade of “One Thousand and One Arabian Nights”? Is she romantic “Queen by Nature” or your personal Muse of “Eternal Inspiration”? Is she “The Conqueror of Your Heart” like Cleopatra or simply “The Fairest of Them All”?
“When I was a child, I saw people treating my mum as someone ordinary, when to me she was Special, a one off, someone who could never be replaced. From that moment K.ing was almost born to say: “You are the Queen of my Heart”.
Hence K.ing started out by making her mum feel special by creating unique pieces hand-made especially for her. Her mum must have been deeply touched as she took K.ing straight to Arts college entrance exams. This was followed by a Degree in Visual Arts and a Masters in Arts and Cultural studies as well as work placements all over the world. While specialists may have thought she was ‘Ace’ Inga knew she was actually a ‘K.ing’ by proving that everyone can be special and should be treated as such. There’s something in that message for everyone out there who questions their own uniqueness.
Today, Diamond K.ing is limited edition, unique wear. It is bespoke in that it is created directly for the wearer with your choice of metals, certified diamond cut Swarovski Element Crystals in all colours. There is also a ready-hand-made collection ready for you to take home or order to be posted to you straight away. The whole Collection is also there for you to rent for specific events so that you too can be feel like a celebrity on night out or even in your own home.
I have to admit I am smitten by the collection, seeing Swarovski Crystals Elements which have a unique sparkle and brilliance magnified by a choice of gold and silver. Looking at the various sets there is almost an endless variation of colours, shapes and sizes that range from earrings, to bracelets and necklaces to headpieces that can only be found at Diamond K.ing.
At a moment like this being a typical man, one’s thoughts turn to cost. I ask the question; expecting to hear rhetoric along the lines of ‘if you have to ask then you can’t afford it’. Instead, her response is much less faint inducing. For individual unique wear her prices are incredible, the smallest pieces start at just £20 and can go up to ten or hundred times more depending on the project in mind.
Why diamond-cut and not diamonds? “Genuine Crystal Jewellery has got more advantages to me as an artist and a woman than the offcuts of diamonds found on the high street. If a man brought me a diamond big enough to being able truly appreciate it though I would feel obliged to call the authorities, the price people paid for diamonds, and not only monetary, is far too high, I am a Queen with a heart and I chose not to work with diamonds who are associated with pain not love. That’s why I love what authentic diamond cut Swarovski Crystal Elements stands for.”
So what was the reaction to Diamond K.ing’s wares? Well, Jewellery was invented to conquer woman’s heart and that is exactly what K.ing does. The reaction of her other customers was evident; each woman’s eyes lighting up, instinctively reacting to the sparkle and wanting to touch and try on the items.
Inga smiles at her customers with real genuine sincerity “I’ve never seen a woman who is not a “jewellery person”, even if some said so at first. She breaths in, her chest and chin rises and her eyes start sparkling more than any man-made jewel; especially when time is taken to match the jewels to her inner character, her dreams and her aspirations for the future.”
When you put it like that I have to agree, even if just for one day where all the other distractions and mandatories of life are put aside, Valentine’s should be like the fairy tale your loved ones deserve. If there is a dream worth chasing then it should be the one where we all live ‘Happy Ever After’ the closer we can get to making that fantasy a reality the brighter the future can only be for us all.
So, have you got a Queen of your Heart?
Are you looking for the ways to keep the sparkle in her eyes?
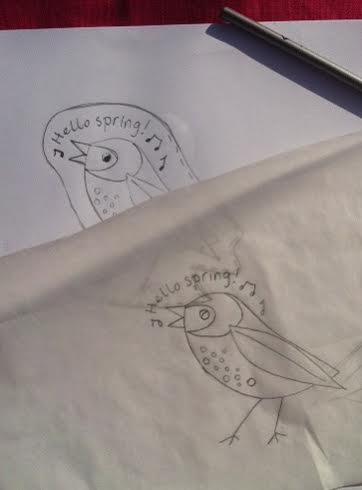
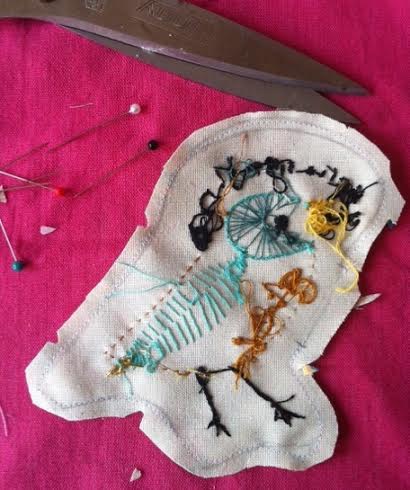
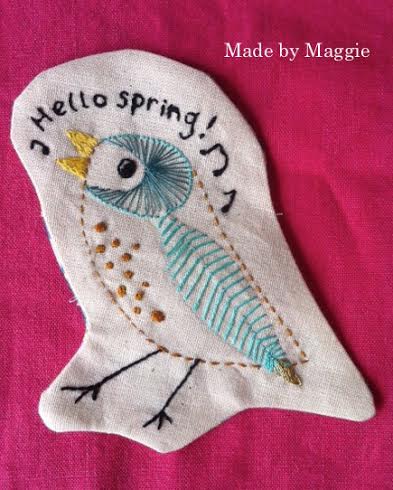
Create a prettily embroidered lavender bag to pack away with your summer wardrobe with Maggie Robb of Made by Maggie
The seasons have certainly changed and it’s time put away summer clothes until next spring. What better way to keep your favourite frocks fresh and protected than with his cute little birdy lavender bag? The herbs inside not only give off a lovely scent, but will also guard against moths. And when you come to unpack everything next year, you’ll be greeted by a lovely upbeat message. Or, why not create your own designs or even personalize the message to make the bag for a friend.
Plain fabric to embroider your design onto. I used calico because I like its rustic feel
Pretty backing fabric to match your embroidery
Household baking parchment to trace your design
Sharp pencil
Embroidery threads in 2/3 different colours, black and a metallic thread, if you want a bit of sparkle
Fairly sharp embroidery needle
Scissors
Embroidery hoop
Sharp needle, and cotton thread. A sewing machine will speed up the process but isn’t essential
A mix of dried lavender and dried rice for the filling
A little bit of toy stuffing
Step 1
Choose your design or create your own. When you’re happy with it, place the parchment paper over the top and with a steady hand trace around the design using a sharp pencil.
Step 2
If your design includes text you will now have to turn your tracing over and using some scrap paper to rest on, trace your drawing from the opposite side. If you’re not using text, and don’t mind your image facing the opposite way, skip to Step 3!
Step 3
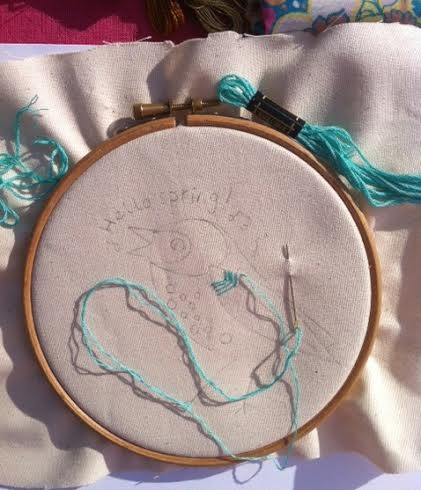
Turn over your tracing so that the pencil outline is face to face with your calico fabric. Making sure that you have a hard surface underneath your work as you will need to press quite hard, carefully trace over the design again. When you remove the parchment paper you should be left with a pencil outline of the design on the fabric.
Step 4
Now for the fun bit! Place your fabric into an embroidery hoop to keep it nice and taut. Select your first embroidery thread and separate the 6 strands so that you are working with just two together. Thread these through your sharp embroidery needle and get stitching! Use a variety of different stitches to add interest to your design. I’ve used satin stitch for the bird’s eye, beak, the spots on his chest and the metallic tips of his tail. Running stitch, backstitch and vine stitch (used on the legs) are great for outlining. And for the turquoise around the birds face I used just one strand of thread in long stitch. The feathers along his wing were done in my latest stitching discovery, Roman stitch. Find tutorials for all these and more on the internet.
Step 5
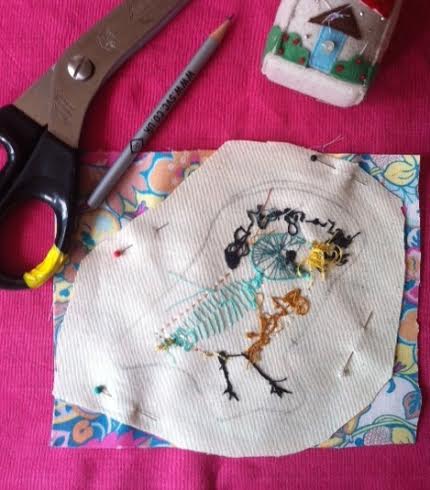
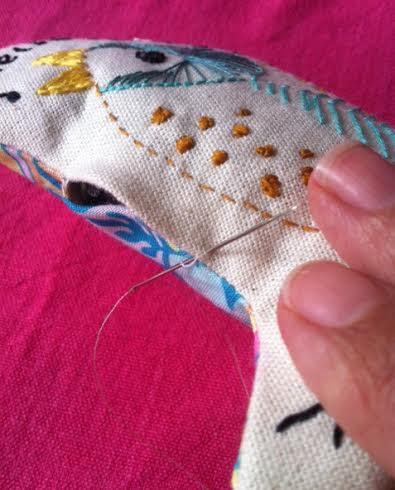
Remove your finished embroidery from the hoop and press with a hot iron. Sketch a rough pencil outline, about 1cm from the stitching ONTO THE BACK of the fabric, to act as a guide for sewing up. Now place the whole thing onto the top of your backing fabric, right sides together. Pin the two together and stitch around your outline leaving a 2 cm gap unstitched for turning.
Step 6
Trim your work to about 0.5cm from your stitching and with a sharp pair of scissors make some little nicks in the seam allowance so that when you turn it through the seam excess doesn’t bunch up or pull your birdy out of shape.
Step 7
Turn your work through and press with a hot iron. Now you can fill your little cushion with a mixture of lavender, dried rice and a little bit of toy stuffing too. The rice adds a satisfying sense of weight, but will also help the lavender to give off more scent by rubbing up against it when you give the bag a squeeze! The toy stuffing helps create a nice smooth finish.
Step 8
Using a needle and thread, hand-sew the gap closed. Your little scented friend is now ready to get to work. Nighty night little bird, see you in the spring!
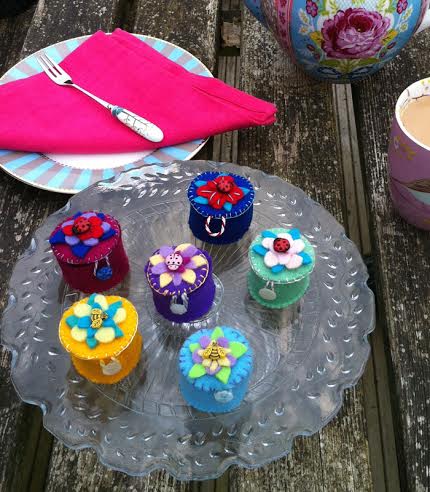
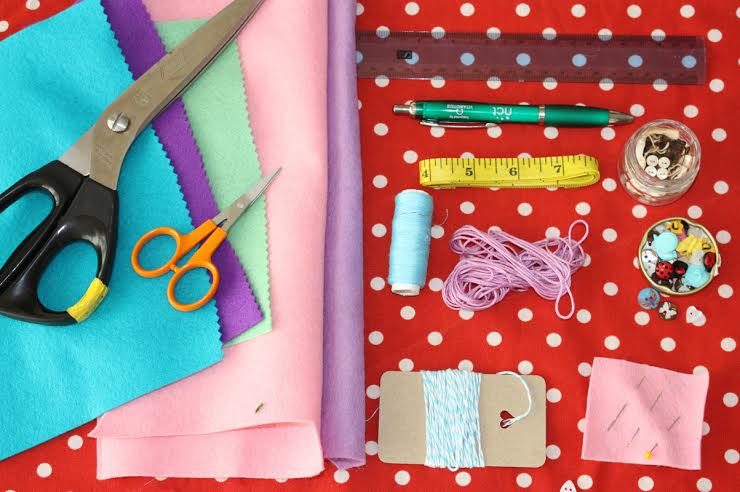
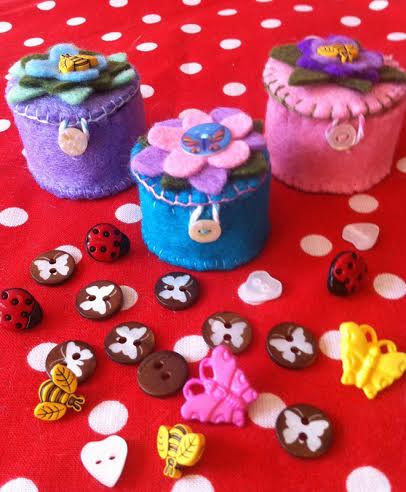
In part two of our series of easy summer makes, Made by Maggie’s Maggie Robb shows you how to turn scraps of felt into the cutest little tape-measure holders – the perfect summery gift, they look good enough to eat!
“It’s a real pleasure to make these adorable little treats – from choosing the lovely shades of felt to sourcing a special centerpiece button. Once you get into your stride, you’ll be able to finish one in about an hour, and the bits and pieces you’ll need can fit snugly into a small purse for easy portability – the perfect way to while away a summer’s afternoon in the park or back garden.”
You Will Need –
Pieces of felt of different colours – a main colour plus two different complimentary shades for the flower petals and a green for the leaves.
Tip –If you can, use thick felt with a high wool content which is stiffer and softer than 100% acrylic felt and often comes in prettier, more subtle colours.
Sewing cotton in a matching shade to your main piece of felt
Embroidery thread in a contrasting colour to your main piece of fabric
Scissors
Needles and a pin
A novelty button to go at the centre of your flower
Bakers’ twine or thin cord for the loop
A small button to fasten the loop
A fabric tape-measure
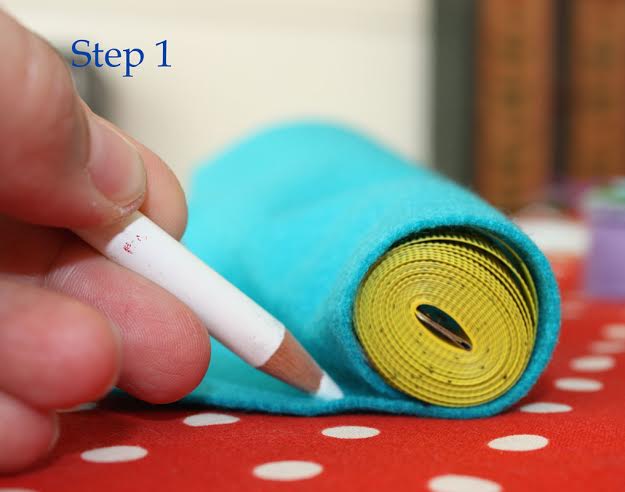
Step 1 – With your tape-measure rolled up tightly use it as a guide for size and cut out three identical circles of felt – two for the lid and one for the base. Then wrap a piece of felt around the side of your rolled tape-measure to discover the length and height of your straight piece.
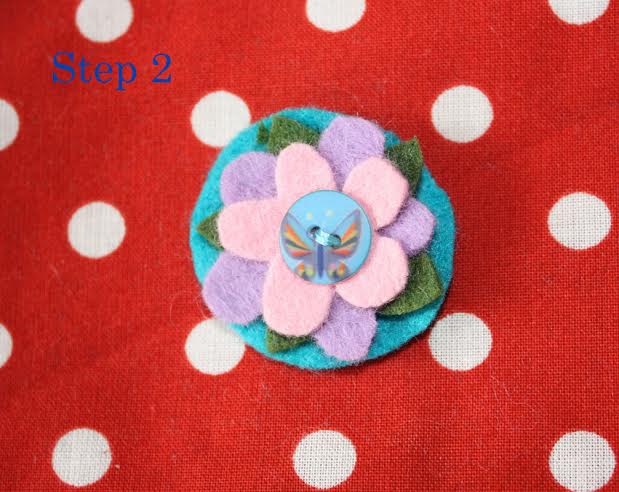
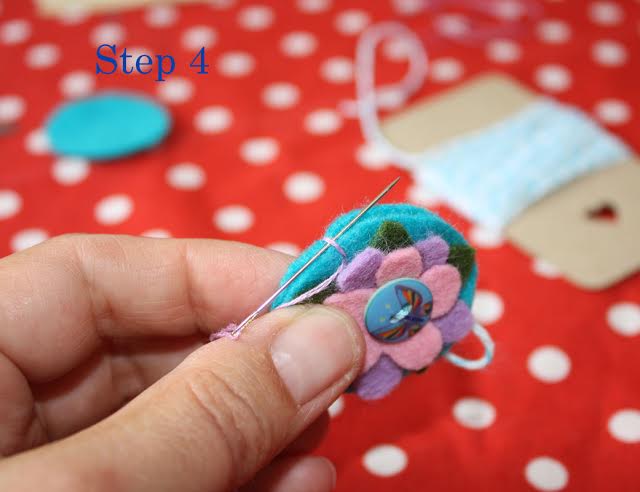
Step 2 –Cut out a flower shape with five petals from each of your contrasting shades of felt. It’s best if your top petal shape is slightly smaller than the one underneath. Arrange with your green piece at the bottom and the two petal pieces on top. Fasten with a couple of stitches using the cotton thread. Then stitch in place your novelty button, centering it in your flower to cover up your stitches.
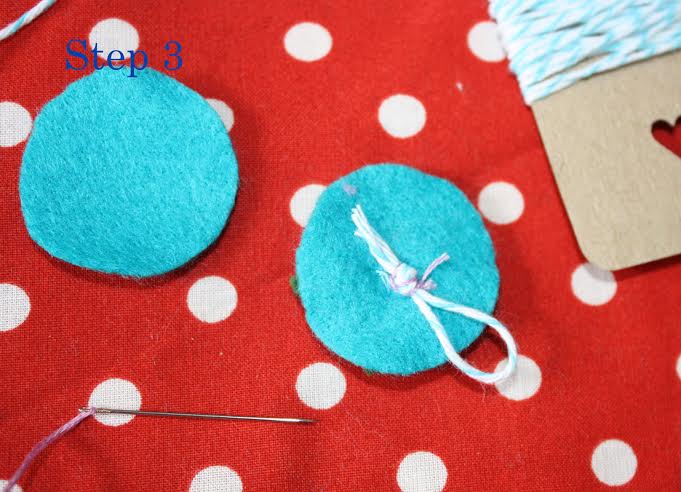
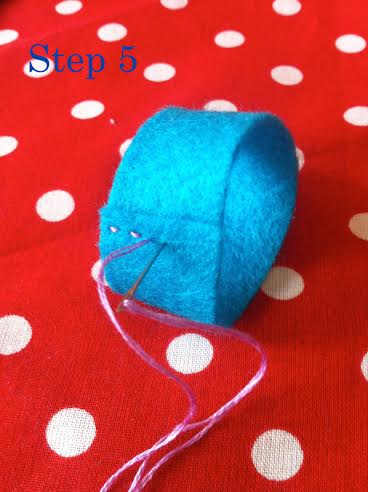
Step 3 – Cut a short piece of bakers’ twine and tie it into a loop. Secure it to the underside of your top lid piece with a couple of stitches so that the loop hangs beyond the edge of the circle.
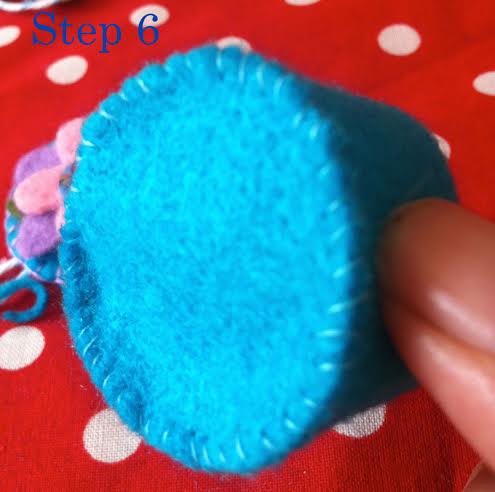
Step 4 – Pin your bottom lid circle to the top one allowing the loop of twine to hang out between the two pieces. Then using a needle threaded with two strands of the embroidery thread, and beginning opposite the twine loop, sew the two pieces together using a neat blanket stitch.
Tip – Blanket stitch looks great against the colour and texture of felt – for easy to follow tutorials on how to master this decorative and versatile stitch, check out the internet and have a practice on some scrap fabric first. Once you’ve got the hang of it, you’ll be hooked!
Step 5 – Now take your straight piece of felt and roll into a pipe shape. Use your rolled up tape measure to check that it will fit snugly but not too tightly inside the pipe. Then with two strands of embroidery thread in you needle secure the pipe with a neat row of running stitches. For added security and neatness close the edge of the join with another row of blanket stitch.
Step 6 – Thread your needle with the sewing cotton. You’re going to attach the edge of your 3rd felt circle to the bottom edge of the felt tube. If you need to, trim away any excess from the circle as you sew. For extra neatness make your starting point just beneath the seam of the tube.
Step 7 – To strengthen the open top lip of you holder and to help the lid sit neatly in place, seal it with a line of blanket stitch using the cotton thread. As before, start and finish at the seam of the tube.
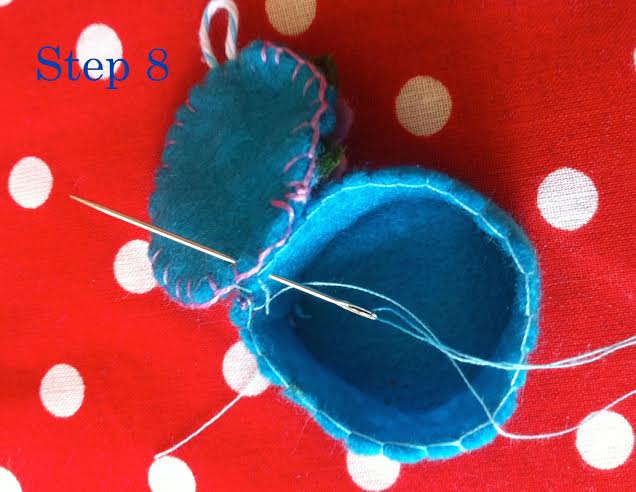
Step 8 – Attach your lid to the felt tube with a couple of stitches. Make sure that you line up the lid so that the join is directly opposite the bakers’ twine loop.
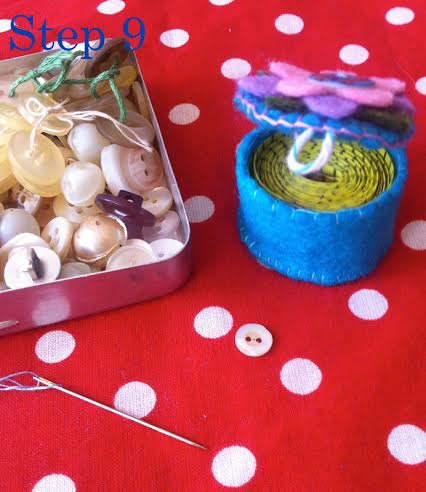
Step 9 – Choose a small button for the loop to fit over and sew it into place.
Step 10 – insert your tape-measure and feel pretty pleased with yourself!
Bet you’ll want to make another one! They’re very moreish.
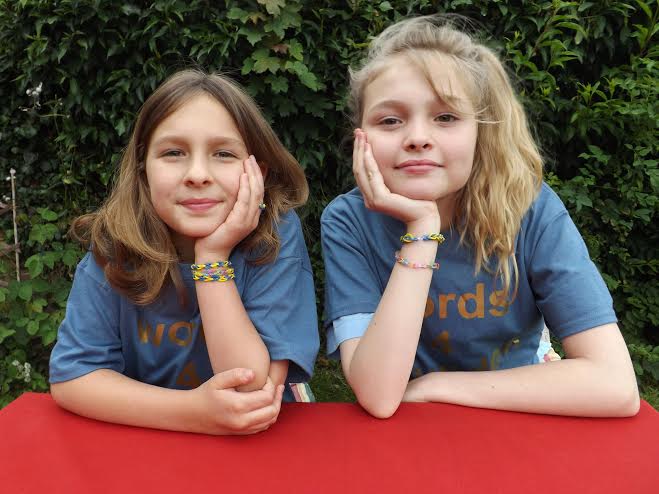
Our grandma, Margaret Graham, is an author and wanted to help wounded troops to recover. She started Words for the Wounded, which raises money with writing competitions, donations and events.
She has two other grannies who help, author Penny Deacon, and reader Janet Speedie. Another grannie, writer Tracy Baines helps sometimes, and our Uncle Matt does extreme sports to raise money for them, and Uncle Kris and his friend Lee did a Triathlon.
The grannies have just done a skydive with Auntie Annie. Next year they are white water rafting. Meg might too, if her back is strong enough after her operation. Auntie Kate does WforW social media and grandpa does the website.
Grandma sometimes says when she is tired and very busy doing her books for Random House, or teaching writing, ‘Why did I start this?’ We know why she did. We all want to help these very wounded young troops.
So we thought we’d make friendship bracelets that the grannies can sell at their events.
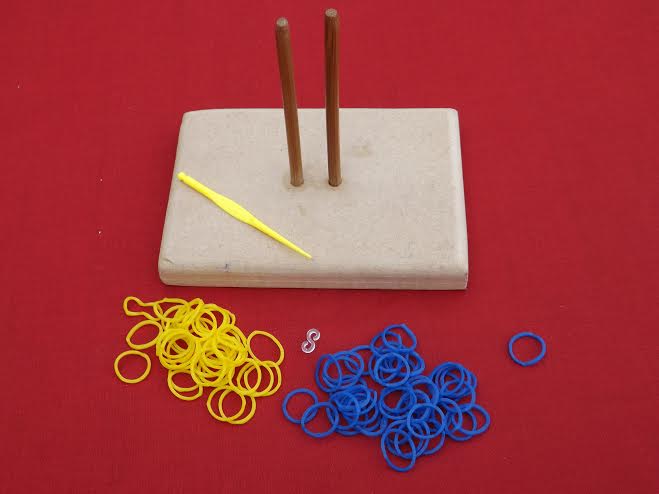
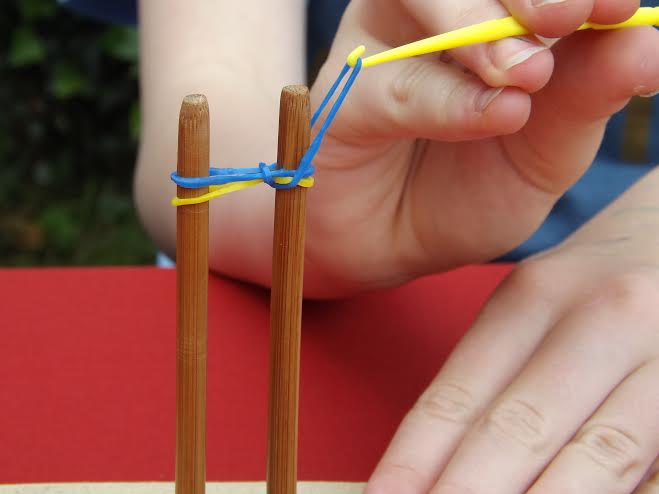
A. This is how we do it, using loom bands. These are available from The Works, Claire’s, and online. You need bands, a hook, a clasp, and a loom if you wish.
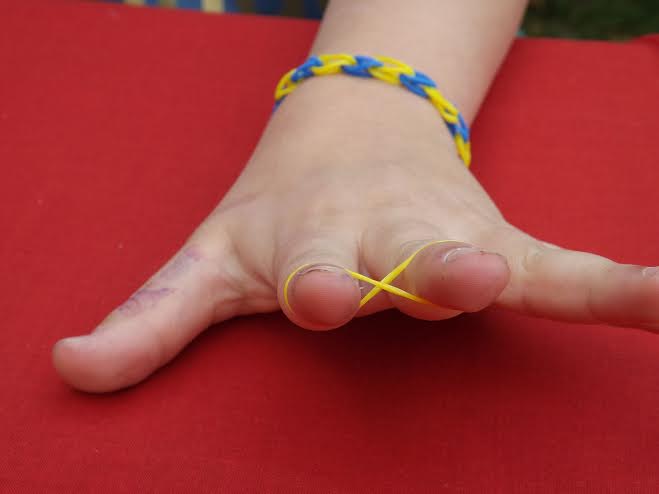
B. Josie is making a chain bracelet which you can make using your fingers. It has a loose link.
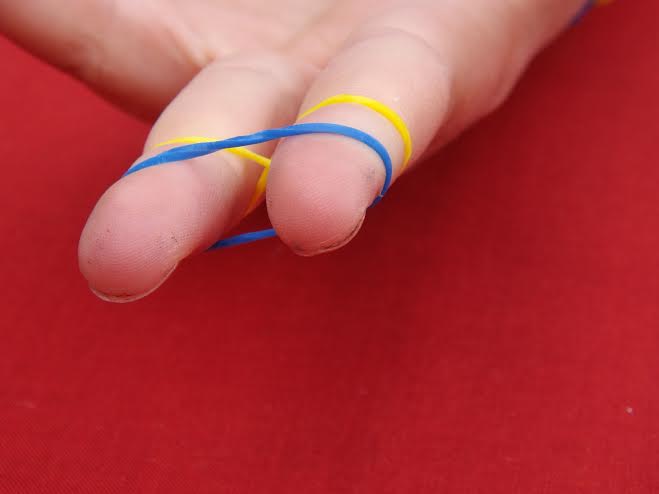
C. Start with two fingers and place the first band over them in a figure of 8. This is the only time you use an 8.
D. Place a 2nd band on top.
E. Use the hook to drag the bottom over top of left finger and release. Repeat with the right. Keep doing this until you have the length you want.
F. Take the left band from the finger and switch it to the right.
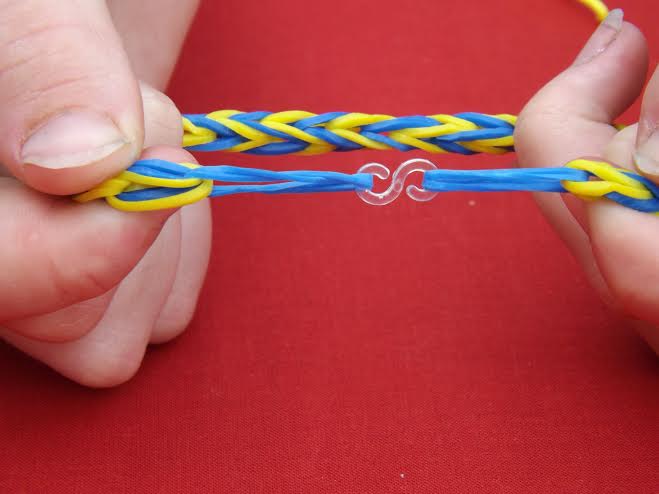
G. Loop the clasp through both ends of the band.
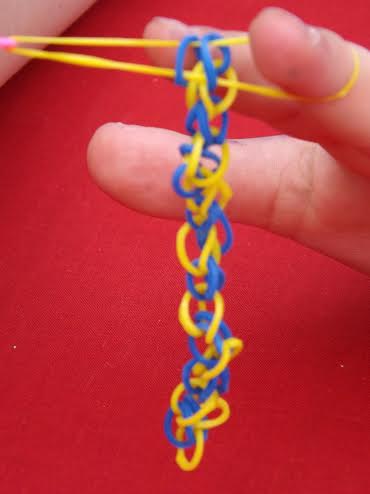
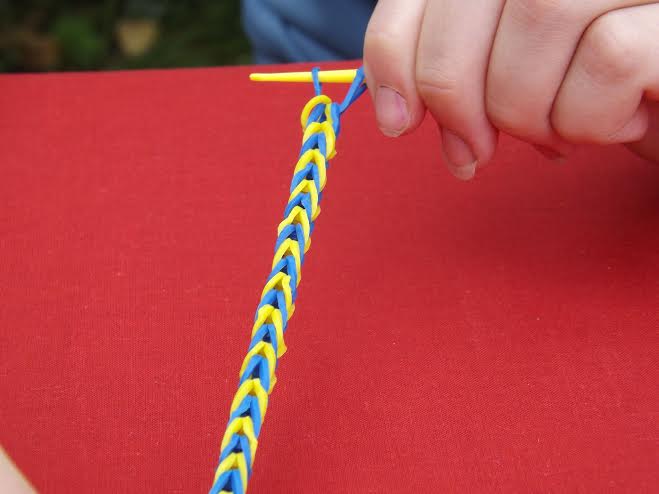
Megan is making a fishtail loom bracelet using a loom, not fingers. It has a tighter link. Grandpa made her look out of grandma’s wooden knitting needles. Grandma made a bit of a face, but only a bit.
1. Start by twisting a band in a figure of 8 round the two pegs. Add 2 more bands, using alternate colours.
2. Use the hook to drag the left side of the band over the right hand peg. Repeat the same step with the right side band until it is the right length. You can make a template by measuring a child’s wrist, or an adult.Repeat the same step with the right side band until it is the right length. Measure it round a child’s wrist, or an adult. To complete: Stop adding bands but continue to use the hook to drag the bands over until you have one left.
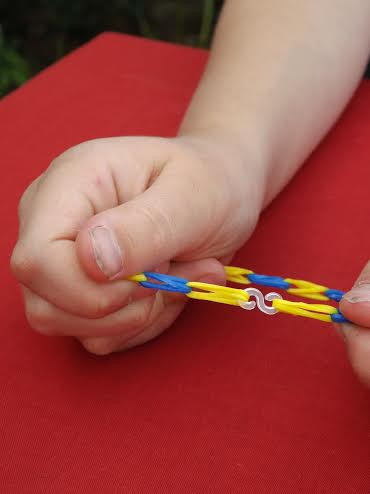
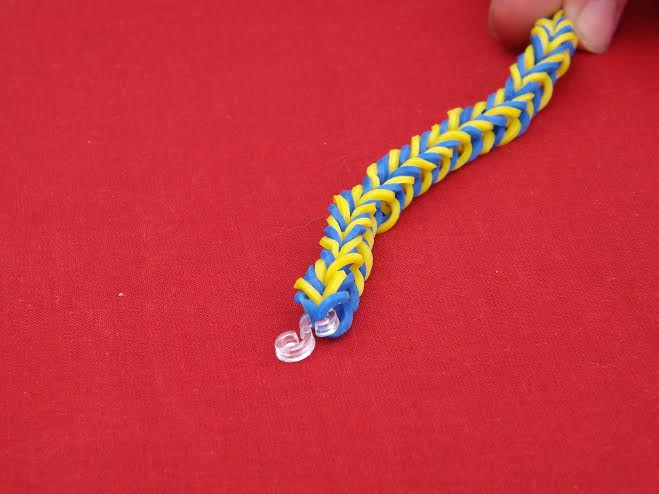
3. Once there is only one band on the hook, lift the left side up but keep it on your hook. Then lift up the right and keep it on your hook. I use Josie to pull down the bracelet, then I feed a band through one side of remaining loop and then through the other side.
4. Then add a clasp like Josie did.
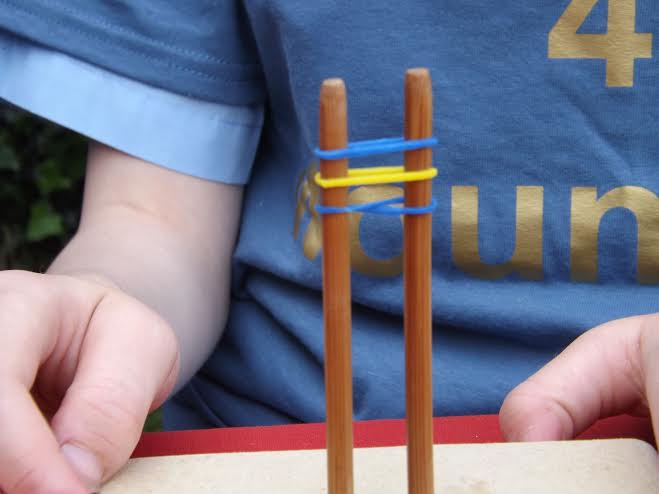
5. Here is the finished bracelet, stretched to show the clasp.
6. There are all sorts of colours you can use. There mood bands that change colour with your mood. We use blue and yellow for Words for the Wounded. If you want to know more about grandma’s charity, go to www.wordsforthewounded.co.uk None of the grannies take any money, so all the money they raise goes to the cause. Grandma does a blog: www.wordsforthewounded.blogspot.co.uk
To celebrate summer, Maggie Robb from Made by Maggie will be sharing some of her favourite seasonal makes. They’re simple enough for everyone to try and you’ll love the results. Visit her on Facebook MadebyMaggie07 for more making tips and lovely stuff.
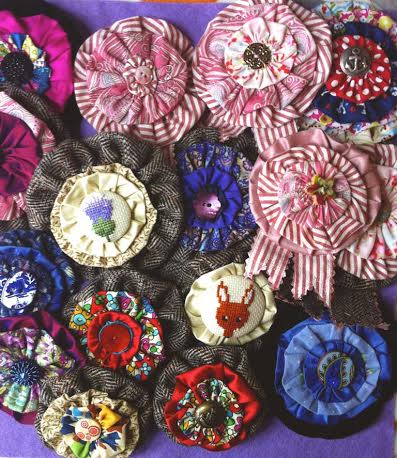
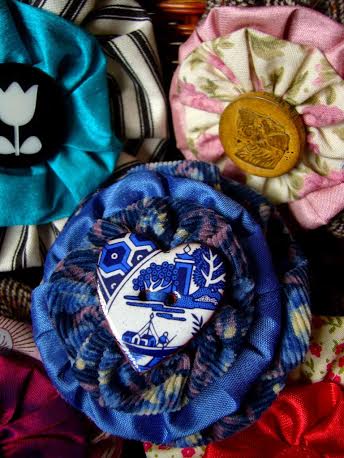
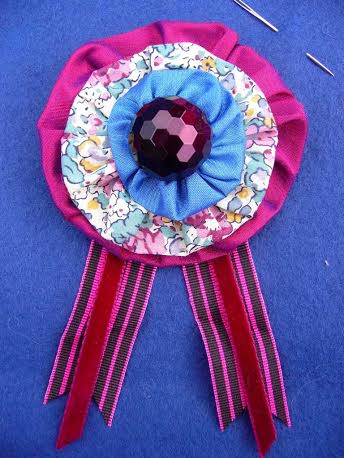
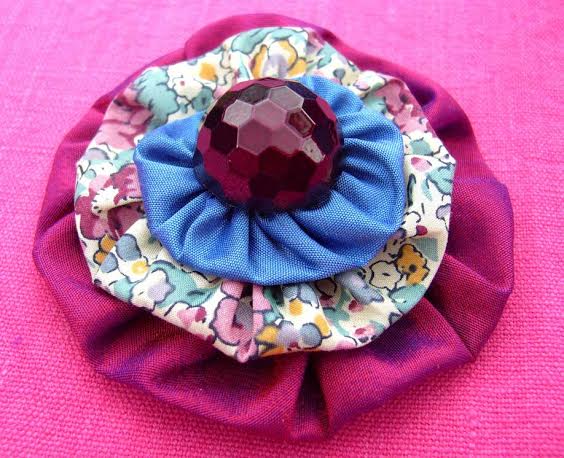
This month – Up-cycle pretty fabric scraps into an eye-catching rosette brooch.
“I totally love making these brooches – they’re a great way to use up the scraps from my other projects and it’s very satisfying piecing the rosettes together and choosing their centres from my stash of vintage buttons. You can make the rosettes as big or as little as you like, and also use them to embellish t-shirts, bags, children’s clothes- your whole world!”
What you’ll need –
Scraps of Fabric in contrasting colours, patterns and textures.
Ribbons and buttons
Wool felt for the backing
Needle and thread
Scissors and Pinking sheers
Brooch clasp (can be found in craft shops like Hobbycraft)
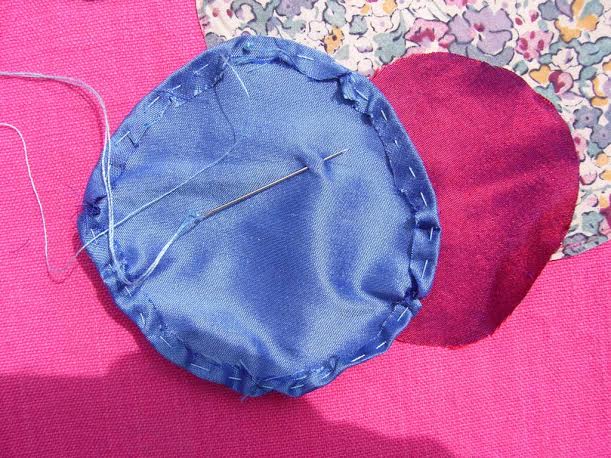
First, cut out three different sized circles from your fabrics. I use cardboard templates with diameters of 16, 13 and 9 cm but you can also draw round anything handy you have at home – a cereal bowl makes a great large rosette and a mug or glass is good for a smaller size. The general rule is that your finished rosette will be approximately half the size of your ‘raw’ circle.
Next, fold over the edge of your first fabric circle and sew a narrow hem with a running stitch.
Gently pull your thread tight to gather up your rosette – smoothing the fabric with your fingers to create neat and even pleats. Thick fabrics like tweed or velvet work better with a larger circle but silks and Liberty Lawn and other thin fabrics can be smaller. Secure your rosette with a couple of stitches.
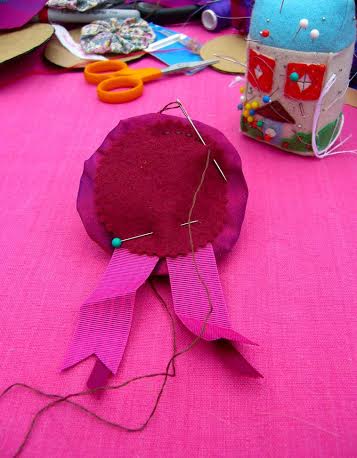
Now for the fun bit! Once you’ve got two or three different sized rosettes you can start assembling your brooch. Choose a centre piece for it from your stash of buttons or pop down to your local fabric or craft shop and choose something – buttons with ‘shank’ fastenings at the back rather than holes can be especially effective. You need to place your rosettes pleated side up to achieve the ruched rosette effect. Secure your layers and button in place with a couple of stitches.
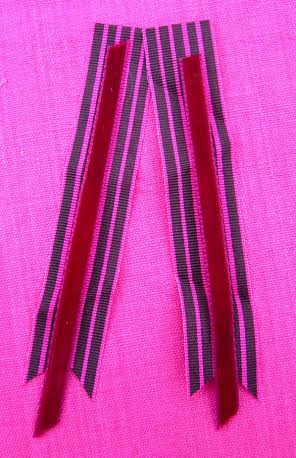
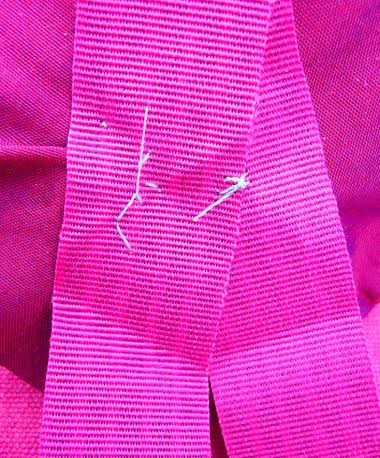
To sew a set of ‘tails’ onto the back of your rosette select a couple of lengths of matching ribbon of different widths. Cut them to the desire length and trim the ends to an arrow to avoid fraying. Attach to the back of your base rosette so that they cross over with a few stiches.
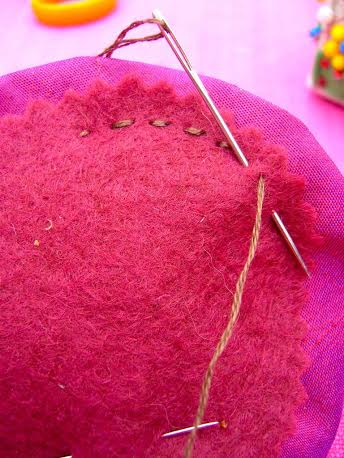
To give your brooch a professional finish cut a circle of felt in a matching shade using pinking shears (zig zag scissors!) to achieve an attractive and non-fraying edge, and sew in place on the back of your brooch using a simple running or back stitch. It’s a good idea to pin your felt circle in place before you start to sew.
Then attach your pin fastener two thirds up and in the middle of your felt circle. And you’re done!
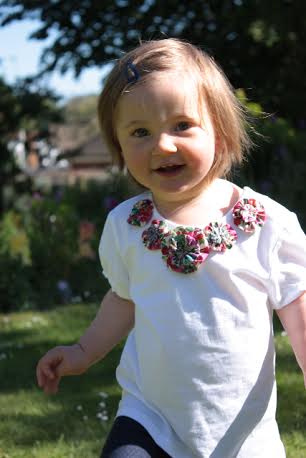
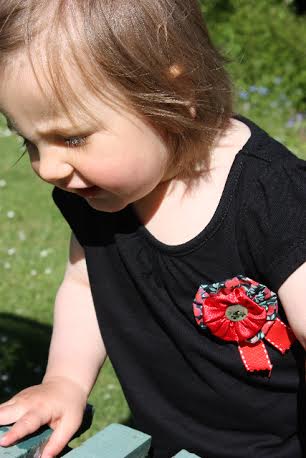
You can experiment using stripy fabrics, porcelain buttons or even cover your own with fabric or snippets of embroidery using self-covering buttons (try any haberdashers or craft store or online) for a really personalized effect. The brooches look great on coats, dresses or even pinned to canvas bags. Or sew a selection onto a t-shirt for you or a little friend! When making rosettes for young children to wear, leave out buttons as these could be a choking hazard.
Next month…… Join Maggie as she shows you how to make a cute little tape-measure holder out of scraps of felt.